Thursday 6 October 2016

The Finished Van

I made this video to go with this guide.. it gives and overview of the van being made. I spent 17 full-on days doing the build and it is a day-by-day account.

Here are some other van shots..


Get the Van Conversion Guide:


What worked really well


So many things work really well – here are my top 10..

Off-grid solar system
If you cannot tell I really love this aspect of the build. All the electricity I need for free forever… so cool!


Just as an example; on a sunny day in Span - early November (when I wrote this comment) it was bringing in 32.5v and 5.3Amps.

Bed-side leaning cupboards
It is so nice to be able to just lean up against it. They work so well and make a nice social environment.


Full size permanent bed
People who hang out are always like ‘oh this mattress is nice!’ and it is. Sleeping two people does not feel cramped and the large under-bed storage is great.


Cutting off the cab
This is totally going to be a matter of personal choice, but that the van stays cooler and is easy to black out is really worth it. Having the cab as another ‘hot’ storage area is useful too. The slider image is cool and keeps me motivated toward my Yosemite goals!


Side lights
These are so damn cool. They make this lovely cozy warm light and when you are in the van at night it feels like you are in some cool boutique hotel room. It is very easy to totally forget that you are in a van. I love this part of the build.


Kitchen unit
It was expensive but it is such a focal point – and that you can fold the lid down is nice. Two burners has been useful, three I do not think would have given any benefit.

Simple water system
For sure, with a 20 liter water tank, you have to fill it up every few days (3 days with 2 people, 5 for one). But having a removable tank means that filling it up is easy from almost any tap. For me it was the right decision. And simple is always good!


The green one is not gasoline - it is the waste water :)


Bathroom Cabinet
The easiest way to make a really nice cabinet is not to make one at all. This was a total success and a great build hack!

Recliner seat by the window
Its just a nice place to sit – the foam is thick enough it has a sofa sort of feel. The view out of the window can be really nice!

Slider food trays
These simple trays from Ikea work really well for food. It is cool down there and not being closed they do not make food sweaty.


The edge of these catch under the edge of the flooring - which does not extend under the drawers - this means they do not slide out by themselves.


Get the Van Conversion Guide:

What didn’t work so well


There is surprisingly not too much to add here – and most of the things are based around a bit of functionality over-kill!

Mains in & battery charger
I wouldn’t bother in the future. The panel and split charge is more than enough.

Seat upholstery
This could just be done better, by not leaving enough space to add the fabric it made these super tight together. I may well redo the base of the chair at some point.

Sliding door cladding (top)
The top of the door is a little wide, I could have done with a bit less cladding-added depth here. But really its no big deal.

More space on electronics board
Because I had to change the smaller Charge Controller for a bigger one – it would have been useful to know this from the start.


Ventilation
This is not really a real problem, we had some SUPER hot days in Paris and the van was warm at night. Half cracking the doors gives good added ventilation but perhaps an added ceiling vent would have helped. Its not always ideal to have the doors slightly opened.

That said, these do not look stealthy and feel such bad quality for money. I did look at yacht port holes – but these are very expensive.

If I was to build again I would re-look in to it – but I am not sure I would change what I have done.

Extraction fan
It is a bit noisy – perhaps there is a better solution – without losing too much stealth element.


Get the Van Conversion Guide:


Finishing touches

Here are a bunch of my van conversion's finishing touches!

Redwood details
The head end of the bed has this redwood piece I cut to make a nice shape.. perfect for lounging over while looking at a nice vew!


The other end has a red-wood plank too – as does the shelf, the window sill and the front of the kitchen unit. It is a nice touch that accentuates key parts of the build away from the standard pine colour.

Aluminum edging
I had a spare bit of this edging, putting it at the back protects the wood from sliding things in and out


Fake plants
I got some fake plants from Ikea.. they look nice (people are often fooled) but at the same time they do not increase the humidity of the van.


Retro style fan switch
I got this chunky toggle switch for the fan – it looks cool and feels nice to use.


I used an off-cut of the Aluminium floor edging for the plate the switch sits on. I had to sand it down to give it the brushed appearance.


Finger training rail
I added this, just srewed it in, it is for climbing training and fits nicely above the door where you can do hang training


Pull handle
I got rid of the ugly plastic handles that came with the doors long ago, however the second door is really hard to close without a handle.

I used some climbing sling folded over and screwed in to make a simple handle to shut the door from the inside with.


Tea towel holder
This cost a few dollars and works really well! It has a self adhesive back so it was just a matter of sticking it on!


Bulkhead table store
I put auto carpet in to this space instead of just covering it up, then I found this table – it is good for doing work while in the van. It also fits perfectly in the hole behind the kitchen unit.

Table stowed away

Hammock
Because, hammocks!


Door panel and extra door handle
When searching for fabrics I found this fabric with nice pictures of birds on.. so I used it on this door panel.

The door with all its insulation and cladding is fairly heavy – so I added this handle to make it easier to open and shut the door while inside the van. I put auto carpet in the area I left behind it so it looks and feels nice to use.


Edging
It is hard to make everything match up precisely on all edges with the shape of the van.. so you can use this edging material to tidy up or cover up screws. Mostly I just tacked it on with panel pins or glued it on.


The aesthetic difference is subtle but it adds up to improve the over all effect.


Get the Van Conversion Guide:


Safety kit for the van


Van safety is cool yo!

I recommend having a gas leak detector, a carbon monoxide detector and a fire extinguisher at minimum.

I put my Carbon Monoxide detector under the chair.


My fire extinguisher has it’s own little alcove – it feels out the way (but easily in reach) and does not affect the over all look of the van very much.


Fire extinguisher alcove

Again, get your systems checked by people who know what they are doing. Your life is worth it.


Get the Van Conversion Guide:


Installing a sound system in your van conversion


I looked in to fancy sound systems but it got fairly complicated and expensive; needing amplifiers, speakers, Bluetooth modules.. and honestly I do like music but adding this technology was going to cost about $500 if it is going to be good.

On top of that there is a space aspect, where will the speakers go.. where will they even look good.

In the end I decided not to bother. I did not really want to put in technology that might just go out of date – or require more maintenance.

The simple solution is simply some USB Bluetooth speakers. I think this is better for the following reasons;
  • They can deliver great quality sound
  • You can use them on your adventures
  • Powered by USB – simple is always good!
  • Can connect to your phone
  • If it breaks – it does not affect the van build
  • You can move it around the van as you wish
  • If the technology goes out of date.. doesn’t matter

For me it was a relief not to have to think about an inbuilt sound system and this solution is by far better.

I got these Taotronic Bluetooth speakers and they work well:


---

Get the Van Conversion Guide: https://www.thevanconversionguide.com/


Bin & Door Light


The bin

I got this bin from Ikea.


It has a flap lid that stops odours escaping. It is not too big which means you will empty it often enough to stop it smelling too bad.

Simply I made this slot for it in the corner. I screwed a couple of blocks of wood in – tight to the bin. Now the bin push-fits in and does not move.

I do not tend to put big bits of rubbish in this bin – just finding a bin for them during the day. It is most used during cooking for food waste or other bits and pieces.

Bin in situ

The blocks that wedge the bin in to place.

Door light

I had a couple of spare LEDs due to an over-ordering mistake.

I decided to add a door light – basically a light by the door that you can easily switch on if you need to see in to the van. It has turned out to be a useful light for watching movies or other activities where the main lights can feel a bit bright.

Luckily, because I installed conduit, I was able to push another wire through (over the roof – which was now fully clad) and was able to have an independently controlled light.


---

Get the Van Conversion Guide: https://www.thevanconversionguide.com/


Fabric panels and Side Lights

As I did not want to have the van fully looking like a sauna, and I wanted to create a separation between the kitchen and sleeping area, I decided to have these fabric covered panels.

I had them covered with 5mm foam, and then fabric, so they are nice to touch – nice in the sleeping area. Plus I think it gives the van better acoustics!


Some have thought the yellow under side part to be a strange colour choice, but this is in part to create a nice warm glow when reflecting the side lights.


First I attached some upright batons to the van. These were screwed in directly to the metal work.

Upright batons

Afterward I basically made the panels, a narrow strip of wood for the LEDs to sit on, and created a way to attach the panels to the wall.

The distance from the bottom of the blue bit, to the LED is based on the angle that the eye gets to the side of the van. I did not want you to be able to directly see the LEDs without really going to some effort!

This also means that the light is all reflected off the yellow fabric! It is amazing!


Making the panels
They are easy to make – just using ply, 5mm foam and fabric. You need spray glue and a staple gun. One tube of spray glue was (just) enough for the four panels.


Below shows the panels in place, checking them for size. I just screwed them up temporarily to do this.


The panels are pretty simple to make;

1. Spray glue on to the wood

2. Lay down the foam, turn it over and staple the foam edges to the back

a. Note use lots of staples evenly on the edges if you want the shape of the edge to look straight

3. Cut off excess foam

4. Spray glue on to the foam

5. Apply the upholstery fabric, turn it over and staple the fabric, as above staple evenly to keep the edge looking straight

6. Cut off excess fabric!

Spray glue, apply foam, turn over.

Staple down, cut off excess.

Srapy glue on to foam, put on the fabric/smooth down, turn over

Staple fabric (evenly) and cut off excess.

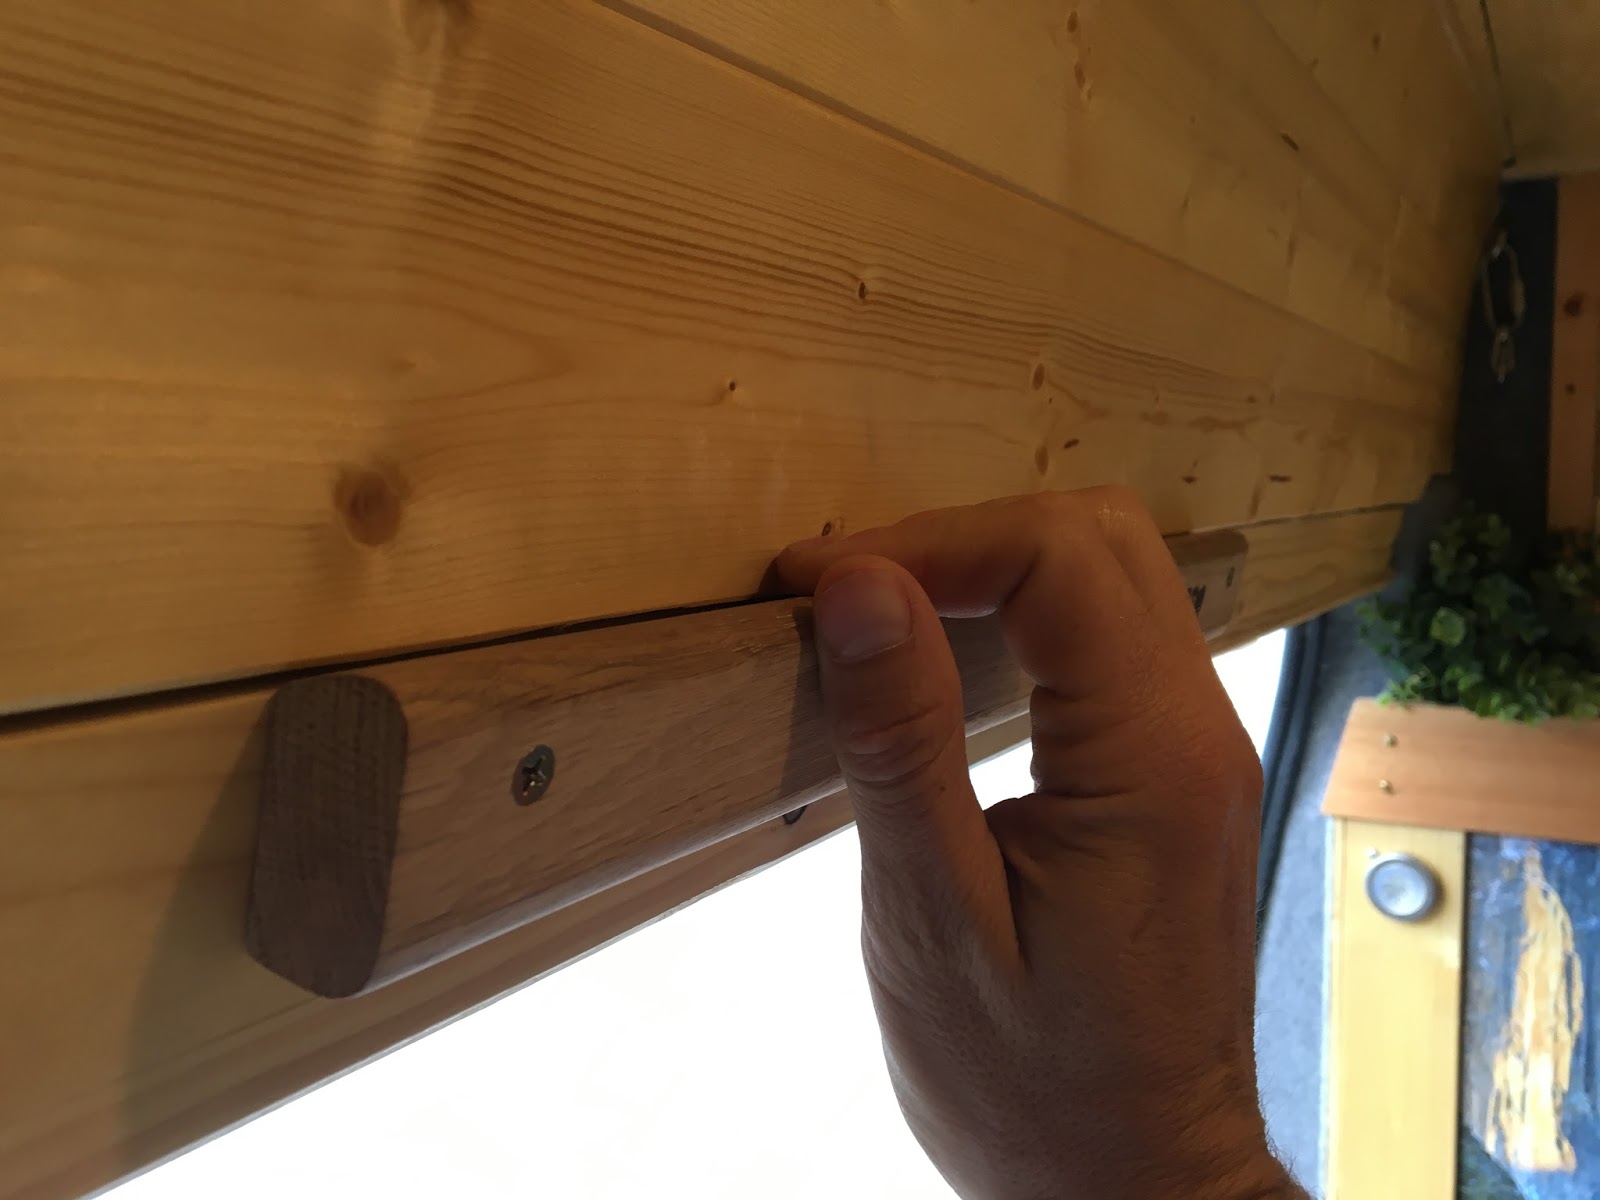
The yellow panels either slotted behind the cupboard unit, or were screwed on (screws where they would be not seen).

Note: Be careful when screwing these on – I found that one time the screw bunched up and ripped the foam inside – making it uneven and a bit messy! It was hard to sort out!


Attaching the top panels so no fixing is visible
I wanted to attach the top panels without screws being visible – so they look nice! Here is how I did it.

Do it BEFORE you add the fabric and foam!

1.   Get standard electrical conduit pipe

2. Get some screw-in pipe clips

3. Make some dowels (or buy some if you can)

4. Screw the pipe clips to the frame you made (I used 5 per board)

5. Screw the pipes, with dowel in, to the back of the panel in the right places

Now you can just pop-on and pop-off the whole panel – and it is help securely without any ugly screws!

See photo below:


Plastic pipe clips & electrical pipe. The pipe is screwed in through the ply in to the dowel inside the pipe. The pipe can now just ‘pop’ on to the clip.


---

Get the Van Conversion Guide: https://www.thevanconversionguide.com/

Above the Cab & Bathroom Cabinet

I had this idea of finding a bathroom cabinet and just screwing it in to the space above the cab. It took a while to find a suitable cabinet – in the end I found this one on Amazon.


It works really well, to open the cabinet you push the button, and when you close it, it locks shut on a magnet. It is nice to have a mirror directly above the sink.

This I screwed into two uprights and, in turn, screwed these in to the wooden block work.

I added these two pieces of work to the bottom of the cupboard areas (see wood under door in image below). This is because the doors need to be a little higher than the shelf to stop them getting blocked by stuff on the shelf.


Using cladding and spare wood I made the doors to fit – cutting out the hinge profile to keep them tidy.


Cut out hinge profile. The wood the hinges are screwed into was offset to the right of the edge of the cladding.


Although you can find all sorts of fancy push-button cupboard door handles I just went for a couple of locking slider bolts.

I think the brass looks good on the pine and I aligned them to the push button on the mirror unit and it looks tidy.


---

Get the Van Conversion Guide: https://www.thevanconversionguide.com/